

How to Set Up a Home Bar Dispense System Step by Step
Quick Summary
A home bar dispense system pours draught beer from a keg at home. Choose a single-tap, multi-tap or countertop setup for your space and budget, match the coupler to your keg type, then connect the gas and beer lines and balance the pressure and line length.
- Single-tap systems suit one favourite beer on a small budget.
- Match the coupler to your keg type or it will not seal.
- Leak-test every gas joint with soapy water before opening the cylinder.
- Balance gas pressure and line length until the pour is neither foamy nor slow.
- Clean the beer line regularly, since old residue makes beer taste off.
Table of Contents
- What You Need Before You Start: Choosing Home Beer Dispense System Equipment
- Connecting a Keg to Your Beer Tap Safely
- Installing Your Home Draught Beer System Step by Step
- Cleaning Your Home Beer Line and Fixing Poor Pours
- Booking Your Equipment and Ordering Your First Keg
- Frequently Asked Questions
What You Need Before You Start: Choosing Home Beer Dispense System Equipment
A home bar dispense system lets you pour draught beer from a keg at home. Before buying a home bar dispense setup, decide which setup fits your space, budget and how much beer you plan to pour.
Most home setups fall into three groups: single-tap systems, multi-tap systems and countertop machines. Each one suits a different kind of drinker.
Single-tap, multi-tap and countertop machines compared
A single-tap system pours one beer from one keg, the simplest, cheapest option.
Countertop machines sit on a worktop and need only a plug. The BLADE Beer Machine is compact and pours straight away, but does not come with a keg, so buy one separately.

Keep these points in mind when you choose:
- Single-tap: best for one favourite beer and a small budget.
- Multi-tap: best for hosts serving several beers at once.
- Countertop machine: best for tight spaces and fast setup, with the keg bought separately.
- Cooling: a built-in cooler or cooling unit keeps beer at serving temperature. The BAR1H Shelf Cooler suits under-counter installs, though note its 3-4 week lead time.
Watch out: a machine that looks compact can still need a lot of clear space at the back for airflow and the gas connection. Measure your spot before you order.

Keg sizes, couplers and compatibility checks
Keg size matters as much as the dispenser. Keg Drop stocks 50L and 30L pub kegs; check your dispenser can take the size you plan to buy. Check your dispenser can take the size you plan to buy.
The coupler joins the keg to your beer line and gas supply. A coupler must match the keg type, or it will not seal and you will lose gas and pressure. The Micro Matic Sankey Keg Coupler is a Sankey keg coupler with a stainless-steel housing and POM lower part for long-term durability.
Before you buy, run these checks:
- Confirm the keg type your dispenser needs.
- Match the coupler to that keg type.
- Check the keg size fits your fridge or cooler.
- Buy the correct beer line and fittings for your tap setup.
Connecting a Keg to Your Beer Tap Safely
Connecting a keg is simple with care. The keg is under pressure, so work slowly and check each connection before opening the gas, including the gas-side safety checks many guides skip.
Let the keg sit in your cooler until the beer reaches serving temperature before connecting it.
Push the coupler firmly onto the keg valve and close the handle to lock it. Connect the beer line to the beer outlet and the gas line to the gas inlet, tight but not over-tightened. A common mistake is connecting lines to the wrong ports, so check the labels first.
Gas cylinder handling and leak testing
Treat the gas cylinder with care (Drum / cylinder handling). Work in a ventilated space: CO2 is heavier than air and collects in low areas such as a cellar floor or under-counter cupboard (General hazards of Carbon Dioxide).
Fit the regulator by hand and check the connection with leak-test solution or soapy water; bubbles mean escaping gas.
Set the regulator to low pressure before opening the cylinder valve, then open slowly and watch the gauge. Raise the pressure gradually rather than correcting an over-pressurised line.
Beer line connection and first pressure test
Use a clean, correctly sized beer line; the Beer Line MDPE 11.7 x 3.16 Natural is sized for standard draught connections.
Open the gas slowly and listen for leaks, then run a short test pour into a jug to check clarity and flow without wasting a serve.
Watch out: never work on a pressurised gas line. Turn off the cylinder, release the pressure at the regulator and only then adjust or disconnect any fitting. Keep a note of your working pressure so you can return to it after cleaning or a keg change.
Installing Your Home Draught Beer System Step by Step
With equipment ready and the keg connected, install the full system. Work through these steps in order and do not skip the safety checks, a single checklist from mounting the tap to the first balanced pour.
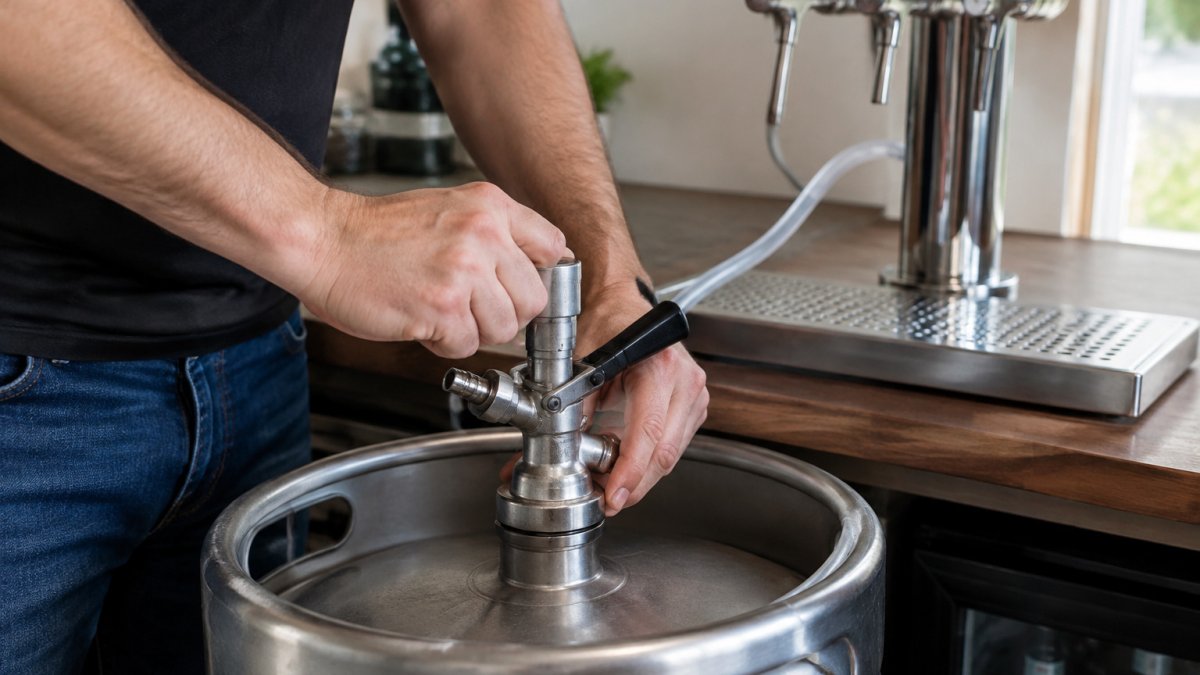
Tools and parts to have ready
Gather these before you start so you are not improvising mid-install:
- A line cutter for clean, square beer-line cuts.
- A spanner set for regulator and coupler fittings.
- A leak-test solution or soapy water in a spray bottle.
- A clean jug for test pours.
- PTFE tape for threaded gas fittings where the manufacturer specifies it.
- A drip tray and a cloth for spills.
The installation sequence
- Mount the tap tower or dispenser in its final position, checking clearance behind and below for lines and airflow.
- Run the beer line from the keg, through the cooler, to the tap, short, direct and without sharp bends.
- Connect the gas line to your regulator and cylinder, then leak-test every joint.
- Fit the flow control valve to the tap line.
- Set the gas pressure and test the flow with a jug pour.
- Adjust line length, pressure or flow control until steady, then record the settings.
For the gas supply, use beer dispense gas suited to dispensing beer.

Balancing line length, diameter, temperature and pressure
Balancing takes trial and error, but the variables work predictably. Pressure pushes beer up the line; line length and diameter create resistance; temperature decides how much CO2 stays dissolved.
Balance gas pressure and line length so the pour is neither foamy nor a trickle.
Keep the beer cold along the whole line, a run through a warm area foams even at the right pressure, so insulate or shorten it.
Record your final pressure, line length and flow-control position.
Safety checks before you pour
Before you pour your first beer, run through a short safety check:
- Check every fitting for leaks by listening and feeling for escaping gas, and re-test with soapy water.
- Confirm the regulator is set to a safe, low pressure.
- Make sure the drip tray is in place and the area is dry.
- Keep the cylinder upright and secured.
- Turn off the gas at the cylinder when not in use.
Watch out: never work on a pressurised gas line. Turn off the cylinder, release the pressure and only then adjust or disconnect any fitting.
The article's balancing guidance comes down to a few variables and their effects on the pour.
| Variable | Effect if too high or too short | Effect if too low or too long |
|---|---|---|
| Gas pressure | Fast, foamy pour | Slow, flat pour |
| Line length | Fast, foamy pour (too short) | Slow, flat pour (too long) |
| Line temperature | Foam if warm along the run | Keeps CO2 dissolved when cold |
| Flow control | Adjust at the tap, not the regulator | Fine-tunes pour without changing pressure |
Cleaning Your Home Beer Line and Fixing Poor Pours
A clean line is the biggest factor in good beer. Old beer residue builds up quickly, making beer taste off and foam uneven. Clean regularly, and straight away when a pour tastes wrong.
Connect a cleaning solution to the coupler using a Sankey Cleaning Socket, then flush with clean water so no solution reaches your glass.
If your pour is foamy, check the gas pressure first, then the line temperature. If the pour is slow, check for a blockage or a kinked line. If the beer tastes stale, the line is probably dirty.
Booking Your Equipment and Ordering Your First Keg
With your equipment list ready, the last step is ordering. Keg Drop offers nationwide delivery and free collection from our Macclesfield depot. Empty kegs can be returned through our easy return process.
Use the coupler filter on the site to match kegs to the correct coupler before you order.
Shop the cellar when your system is ready, and start pouring with a setup you know will work.
Frequently Asked Questions
What equipment do I need for a home beer dispense system?
A basic home beer dispense system needs a keg, a coupler matched to that keg type, a gas cylinder with a regulator, beer and gas lines, a tap or tap tower, and a cooling method such as a kegerator, keezer or a compact dispenser like the BLADE Beer Machine, which costs £499.00 and includes a drip tray but no keg. Check each part is compatible before buying, particularly the coupler and keg format. Keg Drop's intelligent filtering matches kegs to the correct couplers, which helps avoid buying parts that will not fit.
How do I connect a keg to a home bar tap?
Attach the coupler to the keg, making sure the gas and beer connections are secure, then connect the gas line to the CO2 regulator and the beer line to the tap. Open the gas slowly and check every fitting for leaks by listening and applying a little soapy water. A Micro Matic Sankey Keg Coupler (£36.00) is a common choice for standard Sankey kegs, and its stainless steel housing and ergonomic handle are designed for user-friendly operation.
Why is my home draught beer pouring foamy?
Foamy beer usually comes from gas pressure that is too high, beer lines that are too short or too narrow, or beer that is too warm. Lower the gas pressure, check that the lines are long enough to balance the pressure, and make sure the keg and lines are chilled. Dirty lines can also cause foam, so clean them regularly. Keg Drop's 10 litre beer gas cylinders are available for dispensing beer.
How do I clean and maintain a home beer tap system?
Flush the beer line with a suitable beer line cleaning solution after every keg, then rinse thoroughly with clean water until no cleaning residue remains. Clean the tap, coupler and drip tray at the same time, and check fittings for wear. Regular cleaning prevents off flavours and keeps the system hygienic. Keep a record of when each line was last cleaned so you do not miss a cycle.
